The South Florida Fair
The South Florida Fair will showcase the agriculture of Florida and offer many exhibits. This is a typical state fair with fun events from pig races, a petting zoo, rides for the kid and lots of food trucks to keep you interested, fed and entertained.
There will also be a Washington D.C. exhibition of Air Force One, The White House and other monuments.
I had the opportunity to visit the fair grounds as they were setting up the event and the following are some photos of the workers who get lost in all the excitement but are an important part of the event. The Fair runs from January 18th-February 3rd.
http://www.southfloridafair.com/
Website: http://pturo.com
Marky’s – International Food Emporium
I’m always searching for markets where I can find unusual items we like to have from time to time but are not available in your neighborhood markets. As I mentioned in previous posts, there are times when we have our special TV dinners such as when watching a special sports event or concert especially during the Olympics. I try to make these dinners interesting and when possible a small, easy to prepare meal, such as caviar with chopped egg white, egg yolk, onions, toast and a glass of champagne. Always helps when watching Federer, who sometimes keeps me on the edge of my chair a little easier. Or maybe it is a duck terrine magret, saucisson de canard (duck sausages), or foire gras with a light salad and a glass of Sauterne. For dessert I might prepare Vermicelles mit rham (pureed chestnut with cream) or on a scope of vanilla ice cream or meringue. In Switzerland you can buy Vermicelles in a tube and when squeezed out it looks like spaghetti. One of our favorites is a selection of French cheese with fresh fruit, a nice crisp baguette and a bottle of Bordeaux. Sounds a little extravagant, but on occasion having these foods at home is far less expensive then in a restaurant and actually very easy to prepare.

For your special guests you might want to include bit of exquisite to your dish and add shavings of truffles, black or white from Italy or France over a dish of freshly made pasta. And I love risotto nero made with squid ink. So where to get these items became an obsession as soon as I arrived in Florida. I was sure that with such a large population of Europeans, I would find what I was looking for. Although I’m far away from these foods that I use to enjoy in Europe, I have at least found a supplier that will make it possible to bring back some of those wonderful dinner memories and hopefully add a few more to the list.
Marky’s specializes in French, Spanish, Russian, Italian and other International foods in a warm and inviting environment with service that is accommodating and knowledgeable. They will not only answer your questions but will also pack you up with your selections and a bag of ice. If you can’t get to Miami, you can place an ordered on their website and have it delivered. A side benefit to visiting the store however is that the Marky’s location is in an area that has many small ethnic restaurants. These small family owned establishments look so interesting that going into Miami late in the afternoon once-in-a-while and discovering some delicious place to eat after shopping is an added adventure.
I was thrilled when I found Marky’s – International Food Emporium, which has a Russian connection in Miami. You can read more about Marky’s on their website and if you visit the market, try out some of the small restaurants in the neighborhood. I will write about them as I also discover them.
Marky’s 687 NW 79th St, Miami, FL 33150
http://www.markys.com/
“Who’s Bad” Michael Jackson Tribute at the Meyer, in WPB Florida
We set off Sunday to watch “Who’s Bad” concert in honor of Michael Jackson at the Meyer Amphitheatre in West Palm Beach Florida. Our “Meet up Group” enjoys hiking in South Florida but arranged this outing. Sounded great to me – listening to the great music of Michael Jackson next to the harbor among new friends.
We were beginning to have a serious cheese need so we headed off to “The Boys” in Delray to select some cheese to take along. It is always a difficult decision, as we adore cheese. The Boys has a nice selection and we decided on Reblochon (French), Emmentaler, (Swiss) and some Vermont Cheddar. With a bottle of Prosecco, (Italian wine) and a beautiful loaf of Ciabatta bread (Italian), how much more international can you get, we were all set for a late afternoon concert in beautiful sunny surroundings and great music.
When we go to these kinds of events, I like to keep it simple and cheese is always a good bet. I always pack cheese in foil as it doesn’t hold the moisture, which is damaging to cheese. I put a cold pack into a plastic bag and then the cheese and cold pack go into an insulated bag. I like to take the cheese out about 10 minutes or so before eating it as it should come to room temperature. Even in warm climate hard cheese will fare quite well. In this case I also choose Reblochon, one of our favorite, which is a creamy cheese. Packed this way it withstands the warm temperature very well. Of course you can’t just leave it sitting in the sun or it will melt, so don’t take it out until you’re ready to eat it.
Luckily my husband always carries a Swiss Army Knife, which has a corkscrew. You can’t imagine how many times people forget to take one and come looking for someone to rescue them. Well Bruno is always there, uncorking bottles and meeting new friends and enjoying a glass of wine with them.
Some fun photos
Northwood Village in West Palm Beach, FL
 A lucky mistake landed us in Northwood Village and after a short stroll we were making plans to come back. A Palm Beach restoration project brought this neighborhood back to life and it belongs to everyone who visits. Home to Art, antique, interior decorating shops and galleries filled with items that reflect the style of the 1940’s – 1960’s. I felt that I had truly missed but found a period in time that brought out not only the elegant life style of that period, but when color and beautiful furniture decorated the homes throughout the region. Shops are stacked with decorative items that I just wanted to spend hours sifting through. Being an Art Deco fan, this was my candy shop. If my husband didn’t prod me to move on in every shop, I probably still could be found searching in some corner.
When you need nourishment between searches, there are many restaurants, café’s, coffee houses and bakeries ready to feed you and keep you going. At “Bistro, Bistro, The French Bakery” you can have an authentic pâté served with real French bread by friendly owners who are thrilled to speak French with you. This little French Bakery cooks up the real thing and you can easily put together a French picnic to take to the beach or on a boating day or just take home for a French light evening meal maybe with some nice French wine. You know, the French love picnics, and a variety of pâté and country terrine are perfect. I wish this bakery were right next door so that I could just walk over and fill my French food desires anytime. They also have specials, soups and desserts.
We stopped in at Jade Kitchen for dinner and almost walked into the open kitchen. White tables and comfortable white couches fill the small space with views of the busy kitchen activities. The food is fusion with specials from Asian to Mediterranean.
Sunset Bar & Grill constantly changes the tables around so that you never get board with the surroundings. There are Jamaican, Chinese and Italian restaurants ready to fulfill your food preferences.
After dinner we stopped in a coffee-house to listen to jazz and drink an espresso. People sat around on comfortable chairs, someone was sketching the singer, another danced to the the sultry voice of a jazz singer and base musician. Strangers became neighbors enjoying a few nice moments together.
This friendly neighborhood has an “Art & Wine evening every time a new business opens welcoming their new friends in style. Street artists, musicians, craft vendors line the street to entertain you as you stroll in and out of the little shops. The historic neighborhood of Northwood Village is located just one mile north of downtown West Palm Beach between Broadway and North Dixie Highway.
Delray Beach (FL) Easter Pet Parade
Delray Beach Florida is a community that knows how to have fun and that includes the pets. On Saturday an Easter Egg Hunt and Pet Parade attracted some curious customers! The kids as well as the adults who haven’t given up on the Easter Bunny gathered for the annual Easter Pet Parade. Some of the pets were a little unconvinced, but enjoyed all the attention.
Here are some of the cute participants who I’m sure loved all the attention.
Cape Cod Revisited and Steamers
As my 2 month visit to Cape Cod comes to an end, I can’t help feeling sorry that it is over. I have spent most of my summers here as a child and even had lived here on and off over the years. But coming back just to visit has made me see the Cape not at as part-time resident but with new eyes as a visitor. I will always love it here and consider it as a place I call home.
Since becoming interested in photography, I’ve seen the Cape through the eyes of a camera and have seen sights I took for granted and never really saw although they had always been there. I would like to share with you some of the wonderful sites of the Cape from Falmouth to Providence Town and one of its specialties.
I don’t know of anywhere else in the world where you can find steamers. Steamers are a soft shell clam particular to New England. They grow in mucky sand and we used a plunger, pumping it against the sand to bring them to the surface. Because of this it is very important to make sure that they are thoroughly cleaned or you will be eating sand along with the clams.
When buying steamers or any clam, be sure that they are closed. If not, do not accept them, usually the fishmonger will remove them. If you plan to keep them for a day, soak paper towels with water and cover the clams with the towels storing them in the refrigerator.
Steam Clams cooked in beer
5 lbs New England steamers
1 bottle beer
1 bay leaf
1 stick sweet butter
Water
Sea salt to taste

Cleaning them requires that you put them into cold water along with some cornmeal and change it several times. As the clams circulate the water into the shell, the cornmeal helps to remove the sand.

When steaming the clams use one bottle of beer and about a cup of water in a deep pot. For 2 servings as a main course I buy about 5 lbs. of clams. Cover the pot and cook on medium heat until the clams completely open. Any clams that remain closed discard.

Remove the clams from the beer and put them into a dish. The remaining liquid pour into cups for each person. This liquid is used to dunk the clams after removing them from the shell again cleaning off any remaining sand. Give each person a cup of melted butter, which is used to dunk the clams before eating.

There is a black skin on the neck of the clam that must be removed before eating them. The skin is easily removed by using your thumb to scrap it off the neck.

We once saw a woman eating the clams with this skin on and she was finding the clams very difficult to eat or enjoy. I believe restaurants should inform their guests who might not be familiar with eating steamers.
Steamers are the same clam used to make fried clams.

Cranberry Orange Biscotti for Thanksgiving
We always have a tray of biscotti as part of our Thanksgiving desserts. We add a little of our Italian heritage to each course of our dinner. I use an orange lemon biscotti recipe of my grandmothers and add chopped dried cranberries to keep the biscotti in the Thanksgiving tradition.
I picked up a bag of dried cranberries at a market here on Cape Cod where they are grown. They were beautifully moist and added lovely color to the biscotti. Most of the time the dried cranberries are a little hard. Use a good quality brand with supple cranberries.
There are a lot of eggs in this recipe and you will find that the biscotti are not hard even after double baking.

Cranberry Orange Biscotti
Recipe Summary
Prep Time: 30 minutes
Cook Time: 15 minutes @350º F
Yield: 12 Dozen
Dry Ingredients
10 cups flour
2 cups sugar
3 tablespoons baking powder
1 cup walnuts, chopped
2 cups dried cranberries, chopped
Wet Ingredients
12 eggs, beaten
1 lb. melted butter
1 zest and juice of a large lemon
1 zest and juice of a large orange
Frosting
1 cup confectionary sugar
3 1/2 tablespoons milk
2 drops of lemon juice
2 drops of extract (of your choice)
1 tablespoon orange juice
Zest of the orange
DOUGH
Mix the flour with the baking powder. Beat the sugar and eggs and butter together and mix well. Slowly mix in the flour mixture. Fold in the orange and lemon zest and the chopped walnuts. Wrap the dough in plastic wrap and refrigerate it for one hour.

ASSEMBLY
Form loaves about 1 1/2” x 12”. Place them on a parchment paper covered cookie sheet.

BAKE
Bake in the oven until they turn brown at the bottom approximately 15 minutes. Remove from the oven and allow them to cool on a rack. Slice on the diagonal and return them to the oven, toasting them for 3 minutes on one side. This will harden them but not toast them.

Do not cut them if you are freezing them, but freeze the loaves whole.
FROSTING
Frost when they are cool. Use Orange and lemon zest in the frosting and replace the milk with orange juice.
NOTE: Add 1 1/2 cups dried cranberries and drizzle with melted chocolate for a different variation.
NOTE: When making them for myself, I do not frost them but slice them thinly so that you can see the cranberries on the inside. They are very flavorful without frosting.

FROSTING
Add lemon juice and extract to the confectionary sugar. Slowly add in the milk until all confectionary sugar is mixed in and frosting is smooth. It should not be too thin or it will all drip off the cookies and dry transparent. The frosting should be thick enough so that it sits on the top of the cookie.
APPLYING THE FROSTING
If you are freezing them, do not cut on the diagonal, but freeze the loaves whole.
Put the loaves on wax paper and frost and allow them to dry. Cut them on the diagonal. You can cut them first and then drizzle the frosting over the top letting the frosting drip a little down the side. Of drizzle a little melted chocolate over the top.
NOTE: This recipe will frost approximately 3 dozen cookies.

Spaghetti Alle Vongole, Red or White
During the summers on Cape Cod we went clamming twice a week. This was a ritual and at that time the beach in front of our house was a minefield of clams. There were three of us; my brother Mike, my cousin Mary Lou and myself. It took us no time to collect a large bucket of beautiful little necks. We enjoyed clamming so much that we just hated it when we had filled our quota. We dug with our hands and left big holes in the sand. As the tide came in we watched the waves rolling up the beach washing away our path of holes.

We had huge trays of clams on the half shell and the rest we use to make Spaghetti alle Vongole. To us it was not a specialty dish, just one of the pasta dishes our family always prepared and loved.

As I spend some time revisiting Cape Cod, the first thing I did was to go to the fishmonger where I bought fresh little necks. I couldn’t wait to make this dish for my husband who isn’t fond of pasta with fish. He would never even try it so I always made it just for myself. This time however I got him to join me and he was immediately convinced that he had missed something special all these years.
By the way, this has to be one of the easiest pasta dishes you can make, that is, if you can get fresh clams. Do not use canned clams, as they really don’t come close to the flavor you want to achieve.
Spaghetti Alle Vongole
Spaghetti with Clams
Recipe Summary
Prep Time: 10
Cook Time: 20
Yield: 4 Servings
Ingredients
3 lbs fresh clams (little necks preferably)
1/4 cup extra virgin olive oil
3 garlic cloves, whole
1 fresh pepperoncino (chili pepper or sprinkle a few pepper flakes, optional)
1/2 cup dry white wine
1 cup clam liquid (more if needed)
2 tablespoons Italian parsley, chopped
1 lemon
1 lb. spaghetti
Let the clams sit in cold water for at least one half hour to allow the sand to come out. Scrub the shells with a brush. Clams that are opened are not fresh and must be discarded. Cook the clams in about 1 cup of water allowing the clams to steam open. Remove them from the water and discard any clams that do not open. Reduce the water by boiling it for about 2-3 minutes to condense the flavor of the clam liquid. Strain the liquid to make sure there is no remaining sand and put it aside.
Remove the clams from the shells leaving about 5 per person in the shells for garnish. Chop the remaining clams and set them aside. This step is optional, as in Italy they never remove them from the shell.
Sauté the garlic and pepperoncino over medium heat. Add the wine and clam liquid into the pan. If you need more liquid, add more clam juice. Cook the sauce for several minutes and add the clams back into the sauce at the end.


Boil a large pot of salted water and cook the spaghetti until al dente. Put the cooked spaghetti into the sauce and toss the spaghetti with the sauce until it has absorbed some of the flavorful liquid. If you choose to not add the pepper flakes, serve a dish of red pepper flakes on the side. Sprinkle the chopped parsley and squeeze fresh lemon over the top.


Note: For a red sauce, add about 1 1/2 lbs. of tomatoes, skinned, seeded and cubed or cheery tomatoes cut in half or quarters. Add the tomatoes with the wine and clam liquid. Fresh tomatoes need only a few minutes to cook if you want them to remain whole. Do not use tomato sauce as this is a very different sauce and the flavor of the clams will be lost in the heavy flavor of the tomato sauce.
Autumn in New England, a College Tour & Apple Pie Cake
Over the last few weeks we have had the pleasure of takeing our granddaughter on a college tour in Massachusetts and New Hampshire. As grandparents the experience was nostalgic and wonderful to have shared this important time and decision with her. Our base was North Andover, Massachusetts where we also cared for our younger grandchildren and enjoyed a day of apple picking at Smolak Farm. Of course the evening brought apple pie and later in the week apple crisp. One of their favorites is apple pie cake, a recipe I found in my aunt Rosette’s hand written cookbook. It has become an autumn tradition after apple picking and brings back memories of this lovely woman. I always like to associate the family member with my recipes because I think it is important to have our children know people in our family that we have loved and who’s recipes we still enjoy.

Apples such as Macintosh, Courtland and Red Delicious are mainly grown at the farm and are the varieties we have always used in our apple desserts.

I grew up west of Boston and for many years lived in Concord and Boston Massachusetts where I lived among the roads and buildings that played such an important roll in the history of our country. This is home no matter where I am in the world. I always try to visit my family in the Boston area during this time of year – there is nowhere else in the world that is more beautiful in the fall. The colors driving up to New Hampshire were just awesome. The small brooks and rivers with stonewalls rambling alongside of barns I never tire of seeing. The lovely little towns and harbors along the ocean and the beautiful white church steeples and commons centered in every town seem to have been standing there since the beginning of time.

After driving through this beautiful country we sat down to apple pie cake made with the apples we picked ourselves. What could be homier and New England then a house filled with the aroma of apples, cinnamon and cake baking in the oven.

Apple Pie Cake
Recipe Summary
Prep Time: 20 minutes
Cook Time: 45 minutes at 350ºF
Yield: 8 servings
Dry Ingredients
1 cup all purpose flour
1 cup sugar
1 teaspoon cinnamon
1/2 teaspoon nutmeg
1 tablespoon baking powder
1/2 cup walnuts, chopped
Wet Ingredients
2 1/2 cups chopped apples
1/4 cup butter
1 large egg
1 teaspoon pure vanilla extract
2 tablespoons hot water
Topping
Confectionary sugar
Other Things Needed
8” x 8” square baking dish
BATTER
Cream the sugar, butter, and egg in a mixer until smooth. Stir in the flour a little at a time, then add the spices and baking powder and blend well. Add the water and vanilla and thoroughly blend. Fold in the apples and nuts by hand. Make sure they are well coated with the batter.

BAKING
Grease and flour an 8” x 8” square baking dish. Pour in the batter and spread the evenly. Bake at 350ºF for about 45 minutes.

TOPPING
Sprinkle the top with confectionary sugar.

SERVING
This cake can be served at room temperature, warm or with ice cream.
(use cursor to stop slide show)
Foodista Best Of Food Blogs Cookbook is in Bookstores!
Over the last two weeks I have received and read many emails from the winners of the “Foodista Best Of Food Blogs Cookbook”. The excitement of each blogger at seeing their recipe and blog published in the first food bloggers cookbook has been an unexpected part of this experience.
Media events are being planned in many cities across the US and world by the winners to highlight the efforts of food bloggers and their passion for cooking. It is not enough to say that this is an exciting cookbook because all of the participants have a story to tell. Many recipes represent family traditions and this is really what defines this cookbook. It is not just a collection of recipes found often in many other cookbooks, but recipes that the authors take great pride in presenting to the public because they grew up with them. Often they have a very local twist that can’t be found in recipes created in test kitchens or even by professional chefs. It proves that good food can be produced by those who care about representing the best of traditions and passing them on to be created over and over again by those who become part of their family just by preparing them.
Thanks to Foodista for putting a face onto the many unknown home chefs around the world who have something to offer and to tell their stories. Their enthusiasm, commitment and creativeness in their efforts to bring the book to the attention of the world has brought this group together in ways that will define a new way of looking at cooking.
I am proud to be one of them and to have met them via this cookbook. My contribution to the Foodista Best Of Food Blogs Cookbook book can be found at:

The Foodista Best of Food Blogs Cookbook can be bought at Barnes & Nobles, Boarders, and Amazon.com.
http://www.amazon.com/gp/product/0740797670/?tag=foodista-20
Press Release
Blueberry Loaf With Blueberry Syrup
Blueberry picking is a tradition in our family. Everyone joined in, my grandfather, kids and friends packed a lunch and spent a day at the farm picking blueberries.

Since they freeze so well we pick enough to last all winter. Then the fun part begins making pies, cakes, muffins, breads and scones. We have blueberry pies right up to Christmas and the last pie is on Christmas Eve bringing back the fun memories of our summer blueberry picking trip.
Blueberries are packed with health benefits and eating a small cup of frozen berries is a satisfying and healthy snack alternative. They can be mixed with salads, we have even mixed them into lobster salad. Use them in maple syrup for pancakes and in pancakes. I make blueberry syrup and dribble it over my blueberry loaf, which gives it an even more fresh blueberry flavor.

Blueberry Loaf
Recipe Summary
Prep time: 20 minutes
Cook time: 1 hour @ 350ºF
Yield: 8 slices
Dry Ingredients
2 cup all purpose flour
1 tablespoon flour, for dusting the blueberries
3/4 cup sugar
2 1/2 teaspoons baking powder
1/4 teaspoon salt
Wet Ingredients
2 large eggs
1/2 stick butter softened, plus 1 tablespoon for greasing the pan
3/4 cup milk
1 teaspoon lemon zest
1 cup blueberries
Other things needed
9” x 3” loaf pan
Parchment paper
BATTER
Combine the sugar and butter until it is light yellow. Add the eggs and blend. Mix the flour, baking powder, salt and zest together. Add them into the sugar mixture a little at a time alternating with the milk.
Toss the blueberries with a tablespoon of flour and fold them into the batter.


BAKE
Rub a little shortening at the bottom of a loaf pan. Cut a piece of parchment paper the size of the bottom of the pan and line the pan with the parchment paper. Pour the batter into the pan and bake it at 350ºF for an hour or until a tester comes out dry. Allow it to cool on a rack before cutting it.


Make blueberry syrup by mixing sugar and blueberries and maybe a strip of lemon skin and boiling them down to light syrup. The amount of sugar is dependant on the sweetness of the blueberries, add the sugar accordingly. When the syrup is thick enough, strain it through a fine strainer and allow it to cool to room temperature.

Note: This loaf can be made with cranberries.
A Fish Story – In Search for Blue Fish & Striped Bass on Cape Cod
We have spent our summers on Cape Cod ever since we were kids and we loved to fish. Our family always thought that we should have the talent to be geat fishermen because my grandparents came from Gargano on the south of the Adriatic Cost of Italy, and my grandfather was a fisherman (pescatore). We stayed in a big house with my aunts and cousins and my father and uncles alternated days off during the week to join us. My family was in the food and restaurant business and the markets and restaurants were open 7 days a week at that time. We waited for them to arrive and prepared for our fishing trips to the Cape Cod Canal. We would come home from these trips sleepy, smelling of bait, no fish and disappointed but not deterred. After all, our grandfather was a fisherman; we must have inherited this passion from him.
We went to every bait store searching for the right bait. We talked to anyone who could give us fishing secrets or lures that were a sure thing. We paid attention to the tides and set our alarm clocks so that we were at the suggested fishing spots at the exact time the fish were running, and we caught no fish. Later when we older we bought a sailboat and continued the same routine, maybe this was the answer. We had tried fishing off the canal docks, off the rocks, on the beach and we bought all kinds of fishing poles and gear. We would see all the other boats pulling in the fish, the fish leaping out of the water all around us and still no fish. Then my brother decided the sailboat wasn’t the right boat and bought a Boston Whaler. This was surly the answer and the ritual went on and still no fish. I remember he caught a flounder and a bluefish once and this was a great occasion with photo’s and excitement and a grand fish dinner. I have to say that we had lobster traps and were much more successful catching more lobster then we could eat so not all was lost. There were summers when we decided we would catch everything we ate during a weekend. We were great at clamming and carried home buckets of steamers, little necks and mussels. We made calms on the half shell, chowder, pasta with clam sauce, calms casino, stuffed mussels, grilled, boiled, baked, stuffed lobster and pasta with lobster sauce, but no fresh grilled fish. We just couldn’t understand it, what was the problem after all we must have the gene; our grandfather was a fisherman in Italy how could we miss.

The next generation continued this search for the answer and was about to give up. My brother-in-law Peter and my nephew Nick experiencing the same curse went fishing one day and met up with a man who had caught several huge stripped bass. As usual they befriended him and he told them how to make his special lure. As we all laughed at them and said, “Oh here we go again” out they went searching for all the components and proceeded to make this new, magic lure. With trepidation mixed with a lot of hope they headed out to Nantucket Sound. They not only tackled the curse, they have been catching huge blue’s and stripped bass ever since, they broke the curse!

As all this was happening I went to Vieste, Italy searching for information about our grandparents. I was in a state of shock when I noticed his profession in the documents I found. He was not a fisherman but a shepherd (pastore). We should have been raising cattle not fishing. This just goes to show you how the translation of a word can effect your whole life. Our family being mostly 1st & 2nd generation Italian-American never learned to speak Italian and translated the word incorrectly. Well so goes the fishing talent that we thought we should have inherited.

We had a great time in our search for the big fish, and thinking our grandfather was with us, probably he was laughing at us. The most wonderful stories, laughs and memories of our efforts might not have been the same fun. It is like being told that Santa doesn’t exist and not being upset. Being together as a family on Cape Cod in the summer was the best part.
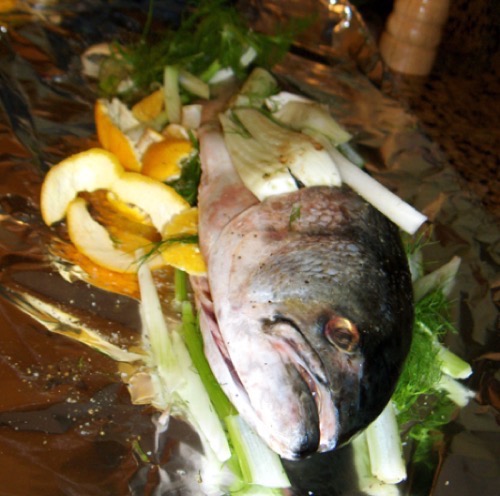
Grilled Whole Fish In Foil
Recipe Summary
Prep time: 20 minutes
Cook time: 30 minutes
Yield: 8 servings
Ingredients
1 18 lb. Fresh whole bluefish, striped bass, cleaned and gutted
1 large orange, skin and segments
2 fennels with stems
Salt & pepper to taste
Other things needed
2 large pieces of foil or parchment paper
PREPARATION
Scale and gut the fish and wash it inside and out. Salt and pepper the inside and outside of the fish.
Lay out enough foil or parchment paper large enough to place the fish and eventually covering it with another piece of foil to form an envelope. Lay the fish on the foil.
Remove the skin of the orange and separate the orange segments. Cut the fennels into thick slices including the stocks and leaves.

Salt & pepper the fish outside and inside the cavity. Stuff cavity with the fennels, orange segments and orange rind.
Place another piece of foil over the top and crimp the edges of the foil to form an envelope.

BAKING/GRILLING
Place the fish on a hot grill or in the oven. If grilling the fish turn it over after 10-15 minutes. And grill it for another 10-15 minutes. The time depends on the size of the fish. Puncture the fish in the thickest part with a knife, if it is done it should go through easily. Don’t over cook as it will dry out.

Remove it from the grill and carefully open the envelope. Remove all the fennel and oranges.
SERVE
Remove the head and tail and fins on the top and bottom of the fish. With a sharp knife remove the skin on one side pulling it gently away from the flesh. Make a cut down the center and cut the fish into segments removing them with specula. If the fish is done the flesh will come off the bone easily. Turn the fish over and do the same to the other side.

Serve the fish with fennel and orange salad. Make a simple dressing of extra virgin olive oil and fresh lemon juice.

NOTE: Other fish can be prepared in this manner such as salmon, trout etc.
Hobby to Business – Cost Control Is Key
Your hobby gives you the space you need that is all your own. It becomes part of your life and love of life. It is your place to go when the stresses of everyday life begins to weigh you down. It keeps you centered and you are good at it. People around you are drawn to the excitement and pride you project. Or maybe its your family heritage that you want to pass down as I did. Whatever drives you to pursue this, friends and family recognize the enjoyment you get out of it. It is a passion that everyone around you shares and suddenly people are saying, “ You know you should start a business”. What could be better then making money at something you love to do.
The ideas begins to keep you awake at night and you can hardly do anything else but think about how you can make your hobby a paying business where you can work on your own time, stay at home, do what you love and even make money.
Starting a business must start with a detailed business plan and a clear description of what your goals are. For me making Italian biscotti was not the goal, but the means to keep family traditions and recipes alive. We talked and joked about it for many years, Each time someone told us that we should sell our biscotti because no one makes them like we do anymore, the desire became more of a passion. Then one day, out of the blue my sister got laid off from her job and in this devastating moment, we said why not, lets do it.
We started down the path of making our dream become reality. Creating a business plan, baking every cookie that was in our family’s hand written cookbooks and pricing out the ingredients, timing each step along the way. When we made them for family events we didn’t consider the cost at all. The first decision we had to make when we realized how expensive they were was what compromises were we willing to make. Do we go for trying to make them less expensive or do we say this is what they cost and we are not going to compromise quality. We put everything down in an excel workbook, set our prices and took a shot.
First were the permits, licenses, packaging and administration as we started our business at home our overhead was less costly but not zero. The costs began to mount and we began to look again at ways to make our product price friendly. We wanted to keep our product authentic, the way our family made and packaged biscotti. We found a packaging manufacturer (Italian packaging), who was willing to sell directly to us eliminating the middleman and sell at lower volumes. Many of these companies sell huge volumns that most small business can’t afford or keep in inventory. Searching out wholesale prices, sales and discounts became an obsession. We buy items we need after the holidays when they go on sale for example. We now kept awake at night worrying about costs; quality was first and foremost so we had to diligently work at cost control, the key to any business success. Since my sister and I have had careers in business, we were already aware of the pitfalls and the things we had to consider from a business perspective. Our family has been in the food and restaurant business ever since our grandparents immergrated from Italy in 1912. We grew up in the business and know how difficult it is.
One other important finding was that all those people that pushed us to turn our hobby into a business were there for us in the beginning. We quickly found out however, that you can’t depend on your friends and family to be your main support and customers. People love the biscotti and buy them, but you can’t sustain a business with friends and family alone. You have to move this business into the market place. This means advertising, sales, insurance, administration, bookkeeping etc. Cost control becomes harder and harder as you enter the world of business and your pride and joy hobby begins to take on more pressure. Your dream hobby job is another reality.
It became clear that we needed something to help us keep costs in check. The excel workbook worked fine for a while but became cumbersome as we began to increase product varieties and production. We needed something easier and faster to make quick quotes, print labels, keep track of our customers, send invoices out and make bookkeeping easier. Reality kept creeping in.
My husband who has a software business offered to write a program for us based on the very detailed excel sheets we had developed over a two year period and the experience we had gained. He had prepared the basis of our excel program that led us in the right direction considering all aspects and factors that had to be considered, always allowing us to know every cost factor and what our profit margin was with every order.
As I began to communicate with others and read articles of people wanting to turn their hobby into a business, I realized that we had some experience that would help others and maybe prevent them from making costly mistakes. The program he developed is the cornerstone of our business and we decided to offer it to home and small to medium size businesses – an inexpensive program that was easy to use and affordable. The Bakers Pricing Software is the result of this effort and we hope it will help others like us reach their dream of bringing their hobby to the market place successfully.
We are currently developing an accounting program that will be integrated with the Bakers Pricing Software.
THE BAKERS PRICING SYSTEM
The Baker’s Pricing Software is a system that stores all essential data to price a product in a database. The most basic data is raw material information. It stores the name, description, vendor and price information and raw material properties such as whether it is perishable, the density if available in order to accommodate volume and weight input for recipes. The system allows quick updates to take care of changes be it price or vendor. Other key information needed for price calculation is stored in the Preferences: Labor cost, energy cost, overhead percentages, material loss percentage and last but not least the profit targets for retail and wholesale. These cost items and the raw material are the foundation for all subsequent calculations and it is extremely important that this data is not only entered carefully but also maintained on a continuous basis as most of the prices fluctuate!
The next step in the process after establishing the basic cost factors is entering the recipes for your products. You select from the list of raw materials available, add quantity and dimension for each ingredient, the amount of labor and the energy used. The cost for individual item wrapping is also added. You will also be asked whether the product can be used on a tray (the basic building blocks of an order) or not. For example a recipe for frosting would not be available for trays but could be entered as raw material and be available for other recipes. The last information to be entered about recipes are the yields, i.e. the number of items you get per recipe and per pound.
Trays of one or multiple recipe items are the building blocks to fill orders. Trays may be actual trays, but also boxes or more generic, sets of items that can be used for different orders. You can assemble trays by units or by weight (if you sell a pound of a recipe item for example). You can add packaging and transportation cost to the trays. The system will then calculate the retail and wholesale price you should charge to meet your profit objectives. You then fill orders using trays. An order is a customer-oriented record. You not only enter a unique identification and the client’s name but also the delivery date, the actual sales price and any additional delivery costs. The system then provides you with a sales and a reimbursement summary for the different expenses incurred. Last but not the least are the cumbersome health permit labeling requirements. The Bakers Pricing Software automatically creates labels for individual products or summary labels for trays.
Page examples and downloads can be found at http://www.pturo.com/

Funghi Porcini
It is quite amazing how people swam around vendor stands in the markets in Italy when funghi porcini are in season. The king of mushrooms are as impressive as they are delicious. They are tossed with pasta, cooked in risotto, are simply delicious grilled with herbs – a meal in itself, served fresh as a salad, sautéd with olive oil and herbs or baked, they can be marinated in olive oil or topping on pizza.

When selecting porcini the gills should not be yellowish-brown, which means that the mushrooms are becoming over-ripe. Do not buy them if they have dark under-caps or black spots and also check for holes in the stems where there might be worms. The short round stems should be firm and white. They have a rich woodsy rustic flavor and are simply beautiful to look at.
Brush off any dirt you may find and wipe the mushrooms clean with a damp cloth. Store them in a paper bag, not in a plastic bag or wrapped in plastic wrap. You do not want mosture to form on them. Prepare them as soon as possible when fresh or they will dry out.
Porcini mushrooms are also dried, found year round in supermarkets and must be hyddrated and have a more intense flavor when cooked. When making risotto or pasta sauce you can also use the hyddrating liquid in the sauce adding a deep concentrated flavor.
Porcini can be found in North America, Europe, and Asia. Fresh Porcini are not as popular in the US as they are in Italy where they are almost over harvested and the collection is regulated. Taking pictures of Porcini is a passion as they are such a beautiful mushroom.
Risotto Funghi Porcini
Risotto With Porcini Mushrooms

Recipe Summary
Prep Time: 7 minutes
Cook Time: 20 minutes
Yield: 4 Servings as first dish 2 servings as main course
Ingredients
1 cup Arborio rice
5 cups broth (homemade or store bought, vegetable, chicken)
1 cup grated Parmesan cheese
1/2 lb. fresh Porcini mushrooms, cut into bite size pieces
1 medium chopped onion
3 tablespoons of butter
3 tablespoons extra virgin olive oil
1 clove of chopped garlic
1/2 cup white wine
Freshly ground pepper
Put the butter and oil in a saucepan and sauté the onions until translucent. Add the rice and allow it to cook until it becomes opaque. Pour in the wine so that it just covers the rice. Stir and allow the rice to absorb the wine on medium heat. Heat the broth and begin to add it in by just keeping the rice covered with liquid. As soon as the rice absorbs the liquid, add a little more. Stir constantly, continue this process until the rice is almost done (has a bite). Add the mushrooms and allow them to cook in the rice for another 2-3 minutes. The entire cooking process takes about 20 minutes. Remove the rice from the stove and add the grated cheese, stir and add a little freshly ground pepper. Stir in the cold butter.
Note: Risotto cannot be leftover. It must be served immediately as the rice will absorb all the remaining liquid and it will be uneatable.
Note: You can substitute fresh Porcini with about 2 oz. dried Porcini mushrooms, which can be found in the most markets. Soak them in tepid water for 30 minutes before using them. Add some of the hydrating liquid to the risotto giving it a more intense flavor.
From Cape Cod bog’s – Cranberry Walnut Bread
October 14, 2009
0 comments
Cakes, Food-Gastronomy, Food-Photography, Holiday Dishes, New England, Travel Photography
Patricia Turo
Cranberries are native to North America and it is known that Indians served cranberries at the first Thanksgiving dinner and served them with venison. They are an amazing fruit growing under sand and wetlands. European settlers actually gave them their name even though the Indians were eating them long before they came to North America. Massachusetts and Wisconsin are the largest producers of Cranberries in the world.
I spent my summers on Cape Cod where there were cranberry bogs in our back yard. After the harvest was over there were many berries lying on top of the bog that got left behind. We would collect them and make muffins and mix them with apple pie – they add a little tartness to the pie that I really like. They are only available in Switzerland in November for a few weeks and to my surprise I am able to buy Ocean Spray cranberries. I buy several bags and freeze them for the year. The European varieties don’t have the same flavor and are much smaller. For more information on cranberries log onto the Ocean Spray Cranberries Inc. web site. http://oceanspray.com/
We tend to think about cranberries only during Thanksgiving and Christmas, but I freeze them and use them as a salsa for meats, in apple pie and crumble, and cranberry bread. I dry them in the oven and toss them in my homemade granola, muffins, biscotti and scones. I make cranberry sauce year round serving it with venison, chicken and pork. Cranberries are a good source of vitamin C and are also full of antioxidants.

Cranberry Walnut Bread
Recipe Summary
Prep Time: 15 minutes
Cook Time: 1 hour @ 350º F
Yield: 12 slices
Dry Ingredients
1 cup sugar
2 1/2 cups all purpose flour
2 tablespoons all purpose flour, for dusting the berries
1 1/2 teaspoons baking powder
1 teaspoon baking soda
1 teaspoon salt
1/2 cup walnuts, coarsely broken, save 3 for decoration
Wet Ingredients
1/2 cup butter, softened
2 large eggs
1 cup sour cream
2 tablespoons orange zest or
2 tablespoon lemon zest
1/2 cup orange juice
1 1/2 cups cranberries
1 teaspoons pure vanilla extract
Other things needed
Parchment paper, cut the size of the bottom of your loaf pan
BATTER
Cream the butter, sugar and eggs until they are fluffy. Add the sour cream, orange zest, and orange juice.
Mix the flour, baking powder, baking soda and salt. Add the dry ingredients with the wet ingredients a little at a time. Using the 2 tablespoons of flour – toss the cranberries into the flour coating them. Fold in the berries and walnuts by hand. Place the parchment paper at the bottom of the load pan. Pour the batter into a greased loaf pan with parchment paper at the bottom and three place whole walnuts on the top of the batter. Drop the pan onto the countertop a few times so that the batter settles evenly.


BAKE
Bake in the oven for 1 hour at 350ºF. Test with a toothpick; it should come out dry when done. Remove it from the oven to a rack and allow it to cool before removing from the loaf pan.

Carciofi o carciofini sott’olio
Artichokes are served in Italy in antipasti preserved in olive oil. The baby artichokes are most often used and are much easier to prepare. However, even though they are grown in California they don’t seem to be found in the markets in large quantities and are only available in small pre-packed packages. In Italy they are available in markets in large quantities and some markets are selling them already cleaned. Preserving them is a great way to have them on hand for a variety of cooking uses. I tossed them with pasta, as a vegetable side dish, in antispasti, as a topping on pizza, with fresh bread dipped in the oil and served with a few artichokes or sautéed, sliced over meat or fish. You can flavor them with your favorite herbs and make them your own special recipe.

A little about Artichokes
The edible portion of the artichoke is basically a flower bud with tough, petal-shaped leaves, and an inedible, flower center. When selecting artichokes, be sure they are tightly packed and are not dried out. It is best if you can buy them with the stems still intact as often found in Italy, but markets in the US tend to cut them off.

There are many varieties of artichokes but the ones most often found in markets are as follows:
Baby anzio is a relative of the romanesco artichoke of the Lazio region of Italy – purple and can be eaten whole
Big heart– green, three to five inches in diameter, are excellent for stuffing
Classic green globe, three to five inches in diameter, similar in shape and flavor to the French camus de bretagne, a summer artichoke grown in Brittany.
Siena, oblong shaped and red in color, four inches in diameter, central Italy, tender and can be eaten raw
The petite mercury, red-violet hue, rounded top, is sweeter than many other artichokes, about three and a half inches in diameter. Similar to baby anzio, comes from the Italian romanesco.
Omaha, dense and rotund artichoke, up to six inches wide, sharply tapered red-and-green leaves and less bitter than many artichoke varieties.
Fissile, two-inch-wide, fruity flavor, deep wine color, Bred from the violetta de provence, native to southern France, tender stalk that can be quickly steamed and eaten.
Chianti, a classically shaped, four-inch-wide, green with a touch of maroon on the leaves, comes from the Italian romanesco.
King, blocky and vividly colored has distinctive green spots at the tips of its leaves, four inches in diameter, bred from romanesco varieties mixed with other Italian artichoke strains.
Carciofi o carciofini sott’ olio
Preserved artichokes in olive oil
The small artichokes or baby artichokes (carciofini) are best for carciofi sott’olio. If they can’t be found then use globe artichokes and cut them into quarters.

Ingredients
Baby or medium size artichokes
Extra Virgin Olive Oil
1 Lemon plus juice, cut in half or quarters, depending on the number of artichokes
2 sprigs fresh basil
1-2 tablespoons honey, optional
Fresh or flaked peperoncini to taste, optional
2 whole cloves garlic, optional
2 tablespoons flour
Other things needed
1 large glass-canning jar
PREPARATION
Trim away the small bottom and tough outer leaves. Cut the tops of the artichokes about 1/4” down or to the tender part. Remove all the leaves down to the white leaves, keeping about 2 inches of stems. Cut the artichokes in half or quarters. Clean out the hay in the middle. Drop them into a bowl of water with lemon juice and the lemon halves. This will keep them from discoloring.

COOKING
In a large pan, bring water to a boil. Add 2 tablespoons of flour in a separate bowl with water until it is liquid paste. Put this mixture in the boiling water. This will prevent discoloring and keep the artichokes a nice light green color.
Put the cleaned artichokes into the boiling water and cook until they just start to get slightly soft about 5-7 minutes depending on the size. Prick them with a knife – they should still be slightly hard. Remove them and place them on paper towels to drain.

When they have cooled, place them in a large glass-canning container. Add the basil, honey, pepperoncini and/or any other herbs, or garlic). Fill the container with extra virgin olive oil. If stored in a cool place they will last for about 2 months.
SERVING
They can be served in an antipasti, or as side vegetable dish. Toss them in a salad, pasta or on a pizza. Slice them over grilled meat or fish. If you plan to use them in food preparation, don’t add the honey. The ingredients above are an example of what can be added, but don’t exclude herbs you like.
Apples, Apples, Apples and homemade Apple pie | The News is NowPublic.com
The early settlers brought Apple seeds to Massachusetts from Europe. A farmer named John Chapman, from Leominster Massachusetts was known as “Johnny Appleseed”. He distributed apple seeds all over North America and became a part of American folklore.
Apples, Apples, Apples and homemade Apple pie | The News is NowPublic.com.
The passion of a New England farm & homemade apple pie
Smolak Farm is surrounded by preservation land in a country setting in North Andover, Massachusetts. A distinct seasonal personality of New England set in a green valley surrounded with vivid warm autumn foliage.

As you drive down this quite country road you are drawn to this lovely farm framed with stonewalls and fruit orchards. Driving closer your pallet begins to salivate as you are pulled towards the sent of cinnamon, sugar, apple cider and the aromas of homemade doughnuts, pie’s and muffins. Without even noticing it you are standing in front of the counter trying to decide which of these desserts you will enjoy. It is impossible to resist. I select some cinnamon sugar doughnuts to take home for breakfast in the morning and look forward to making a warm apple pie for dessert this evening.

Apple picking is a family tradition and we are off to the apple orchards with rows of trees all marked by the variety of apples grown; this is what we came for. As usual we select the largest bag and fill it with several varieties especially good for baking apple pies, apple crisp and apple muffins. Our eyes are bigger then our stomach and we think what are we going to do with all of these apples.

Within a few days they will all be smothered with spices and baked into apple dumplings, pies and crumble and shared with friends and family. Then we head for the pumpkin patch. It is a treasure trove of gourds. We select several for carving and some for baking pumpkin pie. This is New England and the joy of filling our home with autumn scents is a tradition we look forward to.

The passion of the New England farm is alive and well throughout the region.
Apple Pie

Recipe Summary
Cook Time: 60 minutes – 15 minutes @ 425ºF, 45 minutes @ 350ºF
Yield: 8 servings
2 3/4 cups flour
1/2 cup cold vegetable shortening (one cup of shortening if you eliminate the butter)
1/2 cup cold unsalted butter (the butter makes the crust flaky)
2/3 cup ice-cold water
Pinch salt
USING A MIXER OR PROCESSER
Mix the flour, shortening, and salt until it looks like a crumb mixture. Add the butter to the crumb mixture. The mixer or processor does a good job of crumbing the mixture. The butter should only be pulsated a few times to assure it isn’t over processed. The original recipe calls for a total of 1 cup of shortening; you can use a mixture of butter and shortening. Remove it from the mixer or processor and mix 2/3 cup of ice-cold water a little at a time until the dough forms. You may not need the entire amount of water. DO NOT OVER PROCESS OR OVERWORK THE DOUGH. Once you have brought all the ingredients together, cut it in half and form a disk shape by patting it with your hands and put it in plastic bags. Refrigerate them for at least 1/2 hour.
BY HAND
If you are mixing the dough by hand, place the flour in a bowl and add a pinch of salt. Cut the shortening into small pieces and crumble it either with you hands or with a fork. Cut the butter in, but in larger chunks. Add the ice-cold water and bring it together into a ball, the same as the directions above.
Roll half of the dough out and place it into your pie plate. Fill your pie with whatever filling you are using (follow the directions according to the recipe you are using in the Pie Section). Roll the second piece of dough out and place it on top of your filling. Evenly cut the dough around the edges and crimp the dough according to the directions in the recipe. Return the pie to the refrigerator for 15 minutes to 1/2 hour to cool down before baking. The crust should be kept cold. This will make the crust flaky.
FILLING
12 large apples (mixed varieties, see apple varieties list)
1 cup sugar (the sugar quantity depends on the sweetness of the apples)
4 tablespoons butter, cut in quarters
2 tablespoons all purpose flour
1/4 cup cinnamon
Zest of 1 lemon
EGG WASH
I egg
2 tablespoons water
PIE CRUST
Prepare the dough and cut it in half. Cover it with plastic wrap and refrigerate it until you are ready to use it.
Retrieve 1/2 of the pie dough from the refrigerator. Roll out the dough to fit a 9” pie plate. The dough should overlap the plate.
FILLING
Peel, core and cut into sections all the apples and put them into a bowl. Add the flour, cinnamon, sugar and lemon zest and toss the apples until they are completely covered with the ingredients. Put the apple mixture into the prepared cold pie crust and return it to the refrigerator.

TOP PIE CRUST
Retrieve the remaining dough out of the refrigerator and roll it out. Retrieve the pie from the refrigerator. Cut the butter into cubes, dotting the top of the apples in different places. Cover the apples with the second pie crust. Cut around the edges evenly so that it falls uniformly below the rim of the plate; about 1 inch. Roll the dough under all around the rim by hand and crimp the edges. Brush the top with the egg wash and cut the top crust with a sharp knife in decorative cuts. This allows the steam to exit. You can make some decorations with the dough, for example in the shape of leaves etc. and put them on the top before you put the egg wash on. Sprinkle with a little sugar and place the pie in the freezer for 10-15 minutes to cool down the ingredients before baking.

BAKE
Bake in a very hot oven at 425º F for 15 minutes. This will set the crust. Turn down the oven to 350º F for 45 minutes or until done. You can put a skewer into the slit in the piecrust to test if the apples are soft. Remove it from the oven and allow it to cool on a rack to room temperature.

Apple pie is best served warm. A scoop of vanilla ice cream or a slice of good cheddar cheese compliments the pie.
EXAMPLES OF APPLES GOOD FOR PIES
Cortland: Mild, tender
Red Delicious: sweet, crunchy
Jonathan: Tart, juicy, crisp
McIntosh: Slightly tart, tender, juicy
Rhode Island Greening: Tart, firm
Yellow Delicious: Transparent, tart, soft
Granny Smith: Green, tart, crisp
NOTE: You can add raisins, or walnuts and also some fresh ginger or a shot glass of Calvados (Apple Brandy) for an exotic flavor.
Return to main page
International Color Awards
